no image
protostar stack3
old.liveoverflow.com/binary_hacking/protostar/stack3.html Stack 3 - LiveOverflow This video introduces http://exploit-exercises.com, how to connect to the VM with ssh and explains what setuid binaries are. old.liveoverflow.com #include #include #include #include void win() { printf("code flow successfully changed\n"); } int main(int argc, char **argv) { volatile int (*fp)(); char buffer[64]; fp ..
2020.10.29
no image
protostar stack2
문제를 실행하면 environment variable GREENIE를 설정해달라고 한다. 환경변수로 GREENIE를 생성하고 임의의 값을 대입한 후 실행하면 다시 시도하라고 뜬다. old.liveoverflow.com/binary_hacking/protostar/stack2.html Stack 2 - LiveOverflow This video introduces http://exploit-exercises.com, how to connect to the VM with ssh and explains what setuid binaries are. old.liveoverflow.com #include #include #include #include int main(int argc, char **argv) { ..
2020.10.29
no image
protostar stack1
old.liveoverflow.com/binary_hacking/protostar/stack1.html Stack 1 - LiveOverflow This video introduces http://exploit-exercises.com, how to connect to the VM with ssh and explains what setuid binaries are. old.liveoverflow.com #include #include #include #include int main(int argc, char **argv) { volatile int modified; char buffer[64]; if(argc == 1) { errx(1, "please specify an argument\n"); } mo..
2020.10.29
no image
protostar stack0
old.liveoverflow.com/binary_hacking/protostar/stack0.html Stack 0 - LiveOverflow Bruteforcing stack canary, stack guard, stack cookie with a C program. old.liveoverflow.com #include #include #include int main(int argc, char **argv) { volatile int modified; char buffer[64]; modified = 0; gets(buffer); if(modified != 0) { printf("you have changed the 'modified' variable\n"); } else { printf("Try a..
2020.10.29
no image
해커스쿨 FTZ level18
level18 [level18@ftz level18]$ cat hint #include #include #include #include void shellout(void); int main() { char string[100]; int check; int x = 0; int count = 0; fd_set fds; printf("Enter your command: "); fflush(stdout); while(1) { if(count >= 100) printf("what are you trying to do?\n"); if(check == 0xdeadbeef) shellout(); else { FD_ZERO(&fds); FD_SET(STDIN_FILENO,&fds); if(select(FD_SETSIZE..
2020.10.29
no image
해커스쿨 FTZ level17
level17 힌트를 확인해보면 이전 문제들과 비슷한 코드를 볼 수 있다. setuid를 설정하고 call() 함수를 실행한다. gdb로 살펴보면 call 함수가 실행되면 eax에 존재하는 주소를 호출한다. 이는 여태까지 풀었던 문제와 비슷하게 해결할 수 있다. level15와 비슷하게 하되, 환경변수는 level11, 12에서 진행했던 것처럼 쉘 코드를 대입한다. 해커스쿨 FTZ level15 level15 힌트를 확인해보면 14번 문제와 비슷하지만, 포인터 변수를 오버플로우 시켜야 한다는 것을 확인할 수 있다. gdb로 살펴봐도 역시 동일하게 56 byte를 할당받아 [ebp-16]을 가져오므로 40byte+a assb.tistory.com 해커스쿨 FTZ level11 level11 문제 화면이다...
2020.09.29
no image
해커스쿨 FTZ level16
level16 힌트를 확인해보면 shell 함수와 printit 함수가 존재한다. 또한 main 함수 실행 시 printit 함수를 실행하게 되는데, 이를 shell 함수를 실행하도록 변경하면 될 것 같다. main 함수를 살펴보면 "0x8048500"을 ebp에 넣었다가, eax에 넣는다. 그리고 그 eax를 실행하게 된다. printit 함수와 shell 함수를 살펴보니 주소값을 확인할 수 있었는데, main에서 다루는 값이 printit의 주소값인 것을 확인할 수 있었다. 이를 shell의 주소값으로 변경해보기로 했다. esp의 값들을 살펴보면 이전과 동일하게 40 byte의 임의의 값이 존재하고, 그 다음 4 byte에 함수의 주소값이 존재했다. gdb에서 40 byte의 임의값과 shell의 주..
2020.09.24
no image
해커스쿨 FTZ level15
level15 힌트를 확인해보면 14번 문제와 비슷하지만, 포인터 변수를 오버플로우 시켜야 한다는 것을 확인할 수 있다. gdb로 살펴봐도 역시 동일하게 56 byte를 할당받아 [ebp-16]을 가져오므로 40byte+a로 오버플로우 시킬 수 있다. 이때 주의깊에 볼 것은 cmp 부분이다. [eax]라고 레지스터가 [] 사이에 둘러싸여 있는데 이는 이 주소값에 있는 값을 가져온다는 의미이다. 따라서 "\xdeadbeed"라는 값을 가진 환경변수를 생성하고, 이 환경변수의 주소값을 오버플로 시켜 check에 대입해야 한다. 환경변수를 만들고 환경변수의 주소값을 프린트하는 프로그램을 생성해 환경변수의 주소값을 확인했다. 위에서 구한 주소값을 임의의 40 byte 뒤에 붙여주면 check 변수가 오버플로우 ..
2020.09.24

protostar stack3

assb
|2020. 10. 29. 19:52

old.liveoverflow.com/binary_hacking/protostar/stack3.html


Stack 3 - LiveOverflow

This video introduces http://exploit-exercises.com, how to connect to the VM with ssh and explains what setuid binaries are.

old.liveoverflow.com


#include <stdlib.h>
#include <unistd.h>
#include <stdio.h>
#include <string.h>

void win()
{
  printf("code flow successfully changed\n");
}

int main(int argc, char **argv)
{
  volatile int (*fp)();
  char buffer[64];

  fp = 0;

  gets(buffer);

  if(fp) {
      printf("calling function pointer, jumping to 0x%08x\n", fp);
      fp();
  }
}

 소스코드는 위의 사이트에서 얻을 수 있다. buffer을 입력받으며 fp 변수를 위조해 win 함수를 호출해야 한다. 


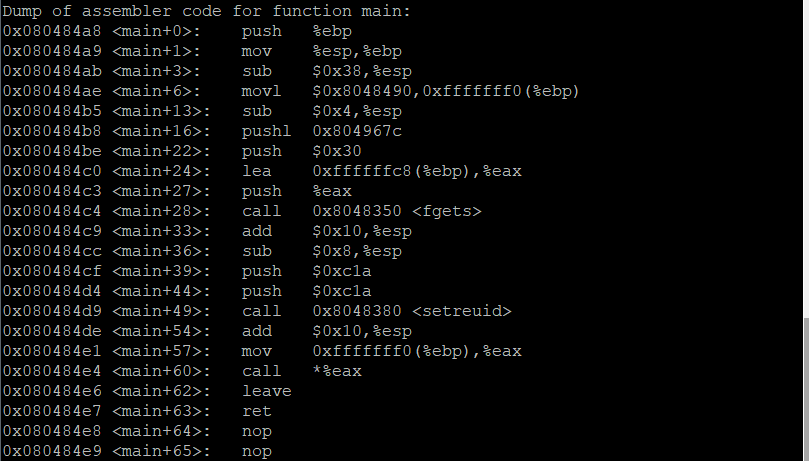
 프로그램을 gdb로 실행하여 stack 구조를 그려보았다. 


 buffer과 fp 사이의 간격을 확인했으니 다음은 win 함수의 시작 주소를 확인했다. 


 임의의 64바이트와 win 함수의 주소인 "\x08048424"를 입력하면 win 함수가 호출되며 문제가 해결된다. 

728x90

'CTF > 시스템' 카테고리의 다른 글

protostar stack5  (0) 2020.10.29
protostar stack4  (0) 2020.10.29
protostar stack2  (0) 2020.10.29
protostar stack1  (0) 2020.10.29
protostar stack0  (0) 2020.10.29

protostar stack2

assb
|2020. 10. 29. 19:46

 문제를 실행하면 environment variable GREENIE를 설정해달라고 한다. 


 환경변수로 GREENIE를 생성하고 임의의 값을 대입한 후 실행하면 다시 시도하라고 뜬다.  


old.liveoverflow.com/binary_hacking/protostar/stack2.html


Stack 2 - LiveOverflow

This video introduces http://exploit-exercises.com, how to connect to the VM with ssh and explains what setuid binaries are.

old.liveoverflow.com

#include <stdlib.h>
#include <unistd.h>
#include <stdio.h>
#include <string.h>

int main(int argc, char **argv)
{
  volatile int modified;
  char buffer[64];
  char *variable;

  variable = getenv("GREENIE");

  if(variable == NULL) {
      errx(1, "please set the GREENIE environment variable\n");
  }

  modified = 0;

  strcpy(buffer, variable);

  if(modified == 0x0d0a0d0a) {
      printf("you have correctly modified the variable\n");
  } else {
      printf("Try again, you got 0x%08x\n", modified);
  }

}

 위의 사이트에 들어가면 소스코드를 얻을 수 있다. 


 gdb로 프로그램을 실행한 후 stack 구조를 그려보았다.


 위에서 그린 스택 구조를 살펴보면 buffer 64byte 아래에 바로 modified가 존재한다. 따라서 64바이트 이상의 값을 대입하면 modified의 값을 변경할 수 있다. 문제를 해결하기 위해 환경변수를 임의의 64바이트와 "\x0d0a0d0a"로 설정해주면 문제가 해결된다. 

728x90

'CTF > 시스템' 카테고리의 다른 글

protostar stack4  (0) 2020.10.29
protostar stack3  (0) 2020.10.29
protostar stack1  (0) 2020.10.29
protostar stack0  (0) 2020.10.29
해커스쿨 FTZ level18  (0) 2020.10.29

protostar stack1

assb
|2020. 10. 29. 19:19

old.liveoverflow.com/binary_hacking/protostar/stack1.html


Stack 1 - LiveOverflow

This video introduces http://exploit-exercises.com, how to connect to the VM with ssh and explains what setuid binaries are.

old.liveoverflow.com


#include <stdlib.h>
#include <unistd.h>
#include <stdio.h>
#include <string.h>

int main(int argc, char **argv)
{
  volatile int modified;
  char buffer[64];

  if(argc == 1) {
      errx(1, "please specify an argument\n");
  }

  modified = 0;
  strcpy(buffer, argv[1]);

  if(modified == 0x61626364) {
      printf("you have correctly got the variable to the right value\n");
  } else {
      printf("Try again, you got 0x%08x\n", modified);
  }
}

 문제의 소스코드이다. stack0과 비슷하지만 1. buffer의 값은 argv[1], 2. modified의 값은 0x61626364가 되어야한다는 점이 다르다. 


 gdb로 프로그램을 살펴보았다. 이를 기반으로 스택을 그렸다. 


 stack0과 스택의 구조는 동일했다. 따라서 임의의 64byte+"0x61626364"를 argv[1]로 넘겨주면 문제를 해결할 수 있다.


 ./stack1 `python -c 'print "\x90"*64+"\x64\x6 3\x62\x61"'`

728x90

'CTF > 시스템' 카테고리의 다른 글

protostar stack3  (0) 2020.10.29
protostar stack2  (0) 2020.10.29
protostar stack0  (0) 2020.10.29
해커스쿨 FTZ level18  (0) 2020.10.29
해커스쿨 FTZ level17  (0) 2020.09.29

protostar stack0

assb
|2020. 10. 29. 19:18

old.liveoverflow.com/binary_hacking/protostar/stack0.html


Stack 0 - LiveOverflow

Bruteforcing stack canary, stack guard, stack cookie with a C program.

old.liveoverflow.com


#include <stdlib.h>
#include <unistd.h>
#include <stdio.h>

int main(int argc, char **argv)
{
  volatile int modified;
  char buffer[64];

  modified = 0;
  gets(buffer);

  if(modified != 0) {
      printf("you have changed the 'modified' variable\n");
  } else {
      printf("Try again?\n");
  }
}

 먼저 소스 코드를 확인해보면 4byte modified 변수와 64byte 버퍼가 존재한다. 또한 buffer을 입력받고, modified의 값이 0이 아니면 (값이 변조되면) 값이 변경되었다고 출력된다. 


 위의 이미지는 gdb로 살펴본 코드이다. 이 코드에 따라 스택을 정리하면 아래의 이미지와 같다. 


 ~ebp, esp 정리~

 <main+1>: ebp를 esp로 옮긴다. (ebp=esp)
 <main+3>: esp에 0xfffffff0을 and 연산한다. 이 연산을 진행하면 esp=ebp+8이 된다. 따라서 ebp와 esp 사이에 8byte의 간격이 생긴다. 
 <main+6>: esp에서 0x60을 빼준다. 이 공간은 main 함수에서 사용하게 된다. 


 buffer과 modified 사이에는 0x44-0x4=0x40(10진수로 64)byte가 존재한다. 따라서 65byte 이상을 입력하게 되면 modified 값이 변경되어 문제를 해결할 수 있다.


728x90

'CTF > 시스템' 카테고리의 다른 글

protostar stack2  (0) 2020.10.29
protostar stack1  (0) 2020.10.29
해커스쿨 FTZ level18  (0) 2020.10.29
해커스쿨 FTZ level17  (0) 2020.09.29
해커스쿨 FTZ level16  (0) 2020.09.24

level18


[level18@ftz level18]$ cat hint

#include <stdio.h>
#include <sys/time.h>
#include <sys/types.h>
#include <unistd.h>
void shellout(void);
int main()
{
  char string[100];
  int check;
  int x = 0;
  int count = 0;
  fd_set fds;
  printf("Enter your command: ");
  fflush(stdout);
  while(1)
    {
      if(count >= 100)
        printf("what are you trying to do?\n");
      if(check == 0xdeadbeef)
        shellout();
      else
        {
          FD_ZERO(&fds);
          FD_SET(STDIN_FILENO,&fds);

          if(select(FD_SETSIZE, &fds, NULL, NULL, NULL) >= 1)
            {
              if(FD_ISSET(fileno(stdin),&fds))
                {
                  read(fileno(stdin),&x,1);
                  switch(x)
                    {
                      case '\r':
                      case '\n':
                        printf("\a");
                        break;
                      case 0x08:
                        count--;
                        printf("\b \b");
                        break;
                      default:
                        string[count] = x;
                        count++;
                        break;
                    }
                }
            }
        }
    }
}

void shellout(void)
{
  setreuid(3099,3099);
  execl("/bin/sh","sh",NULL);
}

 힌트를 확인해보면 다음과 같다. 요약을 해보자면 한 글자씩 입력을 받을 때마다 count를 늘리고, string[count] 명령을 사용해서 값을 대입한다. 또한 0x08이 입력될 경우에는 count의 값을 하나 감소시킨다. 또한 count의 값이 100 이상이면 "what are you trying to do?"라고 출력하고, check가 "0xdeadbeef"일 경우 쉘이 실행되어 문제를 해결 할 수 있다. 


 여기서 주의해서 볼 점은 string의 위치이다. 여태까지 bufferoverflow 시킬 변수는 배열보다 먼저 할당이 되었는데, 이번에는 string 배열이 overflow 시킬 check 변수보다 먼저 할당이 되었다.


 각 변수의 주소를 확인해보았다. 먼저 check 변수의 위치는 0xffffffff98이다. string 변수의 위치는 0xffffff9c이고, count 변수의 위치는 0xffffff90이다. 


 즉 변수가 count check string의 순서로 존재한다. 따라서 여태까지 했던 string의 변수를 오버플로우 시켜서 check 변수의 값을 변조시킬 수 없다. 이걸 모르고 삽질을 많이 했었다. 이 문제를 해결하기 위해서는 string[-1] 같은 방식으로 값을 대입해야 한다. check와 string의 주소 차이는 c-8=4 이므로 \x08을 4번 대입해 4를 빼준 후 "\xdeadbeef"를 넣는다. 


 이렇게 대입하면 check의 값이 "\xdeadbeef"가 되어서 쉘이 실행된다. 


 swimming in pink

728x90

'CTF > 시스템' 카테고리의 다른 글

protostar stack1  (0) 2020.10.29
protostar stack0  (0) 2020.10.29
해커스쿨 FTZ level17  (0) 2020.09.29
해커스쿨 FTZ level16  (0) 2020.09.24
해커스쿨 FTZ level15  (0) 2020.09.24

level17


 힌트를 확인해보면 이전 문제들과 비슷한 코드를 볼 수 있다. setuid를 설정하고 call() 함수를 실행한다.


 gdb로 살펴보면 call 함수가 실행되면 eax에 존재하는 주소를 호출한다. 이는 여태까지 풀었던 문제와 비슷하게 해결할 수 있다. level15와 비슷하게 하되, 환경변수는 level11, 12에서 진행했던 것처럼 쉘 코드를 대입한다. 


해커스쿨 FTZ level15

level15  힌트를 확인해보면 14번 문제와 비슷하지만, 포인터 변수를 오버플로우 시켜야 한다는 것을 확인할 수 있다.  gdb로 살펴봐도 역시 동일하게 56 byte를 할당받아 [ebp-16]을 가져오므로 40byte+a

assb.tistory.com


해커스쿨 FTZ level11

level11  문제 화면이다. uid를 설정하고 strcpy를 실행한다. strcpy buffer overflow 문제라 구글링하여 방법을 찾아 진행하였다.  gdb로 살펴보면 str의 크기를 확인할 수 있다. sub $0x108, %esp에 해당되..

assb.tistory.com


 환경변수로 쉘 코드를 작성해준 뒤 그 환경변수의 주소값을 구한다. 


 이 주소값을 대입하면 쉘이 setuid로 설정된 권한으로 쉘이 실행되고, 패스워드를 확인할 수 있다. 


 why did you do it

728x90

'CTF > 시스템' 카테고리의 다른 글

protostar stack0  (0) 2020.10.29
해커스쿨 FTZ level18  (0) 2020.10.29
해커스쿨 FTZ level16  (0) 2020.09.24
해커스쿨 FTZ level15  (0) 2020.09.24
해커스쿨 FTZ level14  (0) 2020.09.22

level16


 힌트를 확인해보면 shell 함수와 printit 함수가 존재한다. 또한 main 함수 실행 시 printit 함수를 실행하게 되는데, 이를 shell 함수를 실행하도록 변경하면 될 것 같다. 


 main 함수를 살펴보면 "0x8048500"을 ebp에 넣었다가, eax에 넣는다. 그리고 그 eax를 실행하게 된다. 


 printit 함수와 shell 함수를 살펴보니 주소값을 확인할 수 있었는데, main에서 다루는 값이 printit의 주소값인 것을 확인할 수 있었다. 이를 shell의 주소값으로 변경해보기로 했다. 


 esp의 값들을 살펴보면 이전과 동일하게 40 byte의 임의의 값이 존재하고, 그 다음 4 byte에 함수의 주소값이 존재했다. 


 gdb에서 40 byte의 임의값과 shell의 주소값을 인자로 넣어 해당 위치가 쉘 함수의 주소값으로 바뀌는 것을 확인했다. 


 cat으로 프로그램을 잡아두고 my-pass 명령을 실행하니 패스워드가 출력되었다.


king poetic

728x90

'CTF > 시스템' 카테고리의 다른 글

해커스쿨 FTZ level18  (0) 2020.10.29
해커스쿨 FTZ level17  (0) 2020.09.29
해커스쿨 FTZ level15  (0) 2020.09.24
해커스쿨 FTZ level14  (0) 2020.09.22
해커스쿨 FTZ level13  (0) 2020.09.22

level15


 힌트를 확인해보면 14번 문제와 비슷하지만, 포인터 변수를 오버플로우 시켜야 한다는 것을 확인할 수 있다. 


 gdb로 살펴봐도 역시 동일하게 56 byte를 할당받아 [ebp-16]을 가져오므로 40byte+a로 오버플로우 시킬 수 있다. 이때 주의깊에 볼 것은 cmp 부분이다. [eax]라고 레지스터가 [] 사이에 둘러싸여 있는데 이는 이 주소값에 있는 값을 가져온다는 의미이다. 따라서 "\xdeadbeed"라는 값을 가진 환경변수를 생성하고, 이 환경변수의 주소값을 오버플로 시켜 check에 대입해야 한다. 


 환경변수를 만들고 환경변수의 주소값을 프린트하는 프로그램을 생성해 환경변수의 주소값을 확인했다. 


 위에서 구한 주소값을 임의의 40 byte 뒤에 붙여주면 check 변수가 오버플로우 되며 환경변수의 값을 가져오게 된다. cat으로 프로그램이 종료되지 않도록 잡아두고 my-pass 명령어를 사용하면 패스워드를 구할 수 있다. 


 about to cause mass


728x90

'CTF > 시스템' 카테고리의 다른 글

해커스쿨 FTZ level17  (0) 2020.09.29
해커스쿨 FTZ level16  (0) 2020.09.24
해커스쿨 FTZ level14  (0) 2020.09.22
해커스쿨 FTZ level13  (0) 2020.09.22
해커스쿨 FTZ level12  (0) 2020.09.17